
My printed version arrived! It looks great, if I do say so myself.
It's in full color, with a coil binding so that it will stay open to any page.


It comes in two formats:
1. Electronic PDF format for $25. Just send a PayPal payment to my account (stevedeligan@gmail.com), and then send an email to the same address. I'll reply with the PDF copy. You should get it within 24 hours normally.
This is a nice option for those of you who have tablets, or who do your builds near a computer. The links work, and you can sometimes zoom in on the images for a better look.
2. Or PRINTED in full color with a coil binding so that it stays open to any page. Looks beautiful! It's available from Lulu Press for $45. I know that sounds expensive, but it's 123 pages of text and pictures on how to build the Sun Wind HF. It's a very niche book that is printed-on-demand, so it costs a lot to print each full-color copy. I've received lots of positive feedback for my printed Star 45 Construction Manual, so hopefully you'll find this one useful. You should get it within a week or ten days after ordering.
This manual is useful for first time, plank-on-frame builders using laser-cut frames and epoxy fiberglass. It does not use the "pinning" method of old, but rather uses epoxy to a large degree. You won't see hundreds of small holes on your hull.
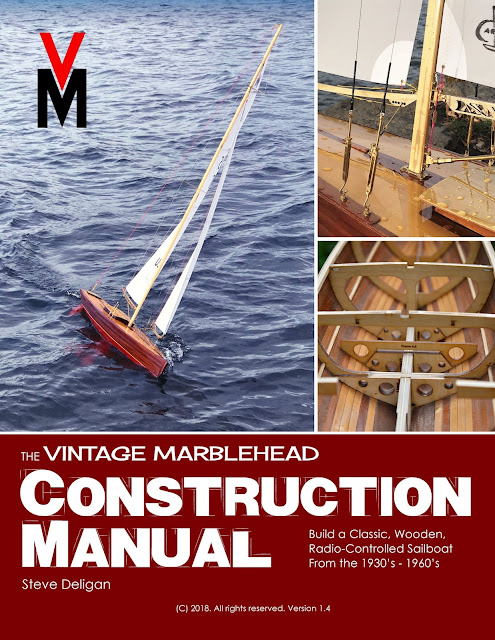
While written using a Vintage Marblehead boat as an example, the methods and skills used can be transferred to a number of RC (radio-control) wooden model boats intended for actual sailing.
This is not a manual for how to build "scale" models! These boats will actually be sailed, and therefore must be water-capable. Scale models will have much more detail, but could never go in the water. Our boats are epoxy coated, water-resistant, and designed to race.
There are three items that are hard to find for anyone wishing to make a Vintage Marblehead RC Sailboat:
1) The laser-cut frames for the design they want to build. National Balsa has the files for the "Sun Wind HF" and you can order directly from them. They will quote you exactly, but it should be less than $180 including shipping and materials. If you want either the "Rip Tide" or the "Wampum", please let me know. National Balsa can cut them, but they don't have the files yet. The "Rip Tide HF" frames should be about the same price, but the "Wampum VM" frames could be more expensive due to several additional sheets.
2) The lead ballast properly sized and shaped for their design. I'm also working on this one! Not sure what the charge will be, but hopefully less than $100 for the Sun Wind and Rip Tide. Probably a bit more for the Wampum ballast.
3) A Construction Manual for how to build a Vintage Marblehead RC sailboat. This manual addresses that final challenge.
Everything else needed to make the boat is readily available from several suppliers, or your local lumber yard (you may have to mill or buy your wood).
Aloha!
P.S. If interested in how to build a Star 45, that construction manual is also available. This was my original construction manual.
It's in full color, with a coil binding so that it will stay open to any page.


It comes in two formats:
1. Electronic PDF format for $25. Just send a PayPal payment to my account (stevedeligan@gmail.com), and then send an email to the same address. I'll reply with the PDF copy. You should get it within 24 hours normally.
This is a nice option for those of you who have tablets, or who do your builds near a computer. The links work, and you can sometimes zoom in on the images for a better look.
2. Or PRINTED in full color with a coil binding so that it stays open to any page. Looks beautiful! It's available from Lulu Press for $45. I know that sounds expensive, but it's 123 pages of text and pictures on how to build the Sun Wind HF. It's a very niche book that is printed-on-demand, so it costs a lot to print each full-color copy. I've received lots of positive feedback for my printed Star 45 Construction Manual, so hopefully you'll find this one useful. You should get it within a week or ten days after ordering.
This manual is useful for first time, plank-on-frame builders using laser-cut frames and epoxy fiberglass. It does not use the "pinning" method of old, but rather uses epoxy to a large degree. You won't see hundreds of small holes on your hull.
While written using a Vintage Marblehead boat as an example, the methods and skills used can be transferred to a number of RC (radio-control) wooden model boats intended for actual sailing.
This is not a manual for how to build "scale" models! These boats will actually be sailed, and therefore must be water-capable. Scale models will have much more detail, but could never go in the water. Our boats are epoxy coated, water-resistant, and designed to race.
There are three items that are hard to find for anyone wishing to make a Vintage Marblehead RC Sailboat:
1) The laser-cut frames for the design they want to build. National Balsa has the files for the "Sun Wind HF" and you can order directly from them. They will quote you exactly, but it should be less than $180 including shipping and materials. If you want either the "Rip Tide" or the "Wampum", please let me know. National Balsa can cut them, but they don't have the files yet. The "Rip Tide HF" frames should be about the same price, but the "Wampum VM" frames could be more expensive due to several additional sheets.
2) The lead ballast properly sized and shaped for their design. I'm also working on this one! Not sure what the charge will be, but hopefully less than $100 for the Sun Wind and Rip Tide. Probably a bit more for the Wampum ballast.
3) A Construction Manual for how to build a Vintage Marblehead RC sailboat. This manual addresses that final challenge.
Everything else needed to make the boat is readily available from several suppliers, or your local lumber yard (you may have to mill or buy your wood).
Aloha!
P.S. If interested in how to build a Star 45, that construction manual is also available. This was my original construction manual.
Comments
Post a Comment