
I've been asked by many people how to get started making wooden radio-controlled (R/C) sailboats.
First, I must give full disclosure... I'm not the best person to talk to as I'm not the best builder out there. In every class there are some who rise to the absolute master-craftsmen level and I'm nowhere near being on that list! Yes, I've made several boats, and they look decent enough. I can help steer you in a good direction, but you're on your own in making the boat of your dreams.
When people ask me how to get started, I usually tell them that making a wooden RC sailboat is neither quick nor cheap. It can take months to make a boat. It may be cheaper than buying a modern carbon-fiber Marblehead, but making your own boat is still much more expensive than simply buying one of todays off the shelf: Victoria, Seawind, Dragon Force, etc... For a few hundred bucks you can be sailing that afternoon in a plastic boat that is virtually indestructible. They sail well and look ok.
I would only suggest making your own wooden RC sailboat if you specifically WANT a wooden RC sailboat. If you're attracted to the beautiful, classic look of a wooden hull and you aren't all that concerned about having the absolute fastest boat on the course, and you've got a couple thousand dollars and hundreds of hours to spare, then this is the hobby for you! Oh, and you'll need some tools too, so it's a great excuse to go tool shopping.
Still interested? Okay, then here's what I would suggest...
Research the Hobby:
Check out your country's governing body for radio sailing. In the US, it's the American Model Yachting Association (AMYA). Look at which classes are sailed in your area. Is one of them a builders class or developmental class that appeals to you? One popular internationally raced class is IOM (International One Meter) and you can still build a relatively competitive wooden IOM.
Consider a Kit Boat:
Consider a kit boat. There are a few out there. A very popular wooden kit boat is the Tippecanoe T37. It's a wonderful kit that includes everything including the radio equipment. My first wooden RC boat was a T37 and I would never have gone on to build other boats without being "kick started" by it.
You make the boat on your own, but it comes with a very thorough construction manual that guides you through the entire process. You'll learn how to use epoxy and fiberglass (included with the kit), how the electronics work, and on and on.
In the Seattle, WA, USA area, the T37 is a very active class and there are many who can help you get started. There are also some very helpful YouTube videos that will guide you through the entire process.
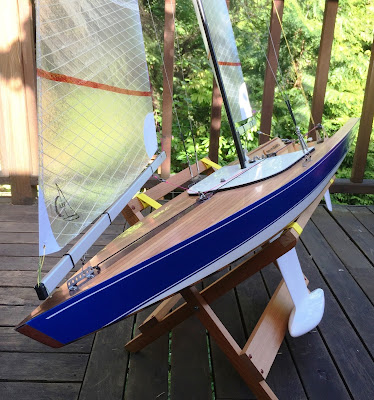
A racing upgraded T37 will cost approx. $500 with everything included and you can see how well you work with wood. There are many beautiful T37's out there and yours might be one of them.
Here is my T37...


Fair warning! For some, myself included, the T37 is a "gateway" boat to many others! You can get hooked pretty easily.
After building the T37 I've gone on to build Star 45's, Vintage Marbleheads, and now I've just completed an IOM.
Other than the T37 there aren't that many wood sailboat RC kits out there. There are things called "short kits" though. A short kit is where you purchase a bare minimum from a company and then you supply the rest. For example, you can buy the laser cut frames for a Star 45. That's all you get, but you can provide the rest from easily available materials... it's the laser cut forms that are harder for you to create. A short kit is a nice way to get a start on a more complex boat.
TOOLS needed:
If you need an excuse to buy tools, then making classic, wooden RC sailboats might be reason enough to get an entire woodshop! But in reality you really only need a few tools, some of which you may already have.
Ignoring the smaller hand tools that many already have, you'll probably need to stock up on a few "hobby" tools like a razor saw, small screw drivers, hobby knives, etc...
If you're just making a kit like the T37 then that may be all you need. But if you're wanting to make your own boats from scratch, then you'll need a way to cut planks. I do mine on my contractor level table saw. If you don't have a tablesaw, then you might be able to purchase planks elsewhere too.
I've also found that a stationary sander is a necessity. I use mine all the time. There is no way I could have made my boat without one. In addition, I have extensively used a random orbital sander for shaping the hull.

First, I must give full disclosure... I'm not the best person to talk to as I'm not the best builder out there. In every class there are some who rise to the absolute master-craftsmen level and I'm nowhere near being on that list! Yes, I've made several boats, and they look decent enough. I can help steer you in a good direction, but you're on your own in making the boat of your dreams.
When people ask me how to get started, I usually tell them that making a wooden RC sailboat is neither quick nor cheap. It can take months to make a boat. It may be cheaper than buying a modern carbon-fiber Marblehead, but making your own boat is still much more expensive than simply buying one of todays off the shelf: Victoria, Seawind, Dragon Force, etc... For a few hundred bucks you can be sailing that afternoon in a plastic boat that is virtually indestructible. They sail well and look ok.
I would only suggest making your own wooden RC sailboat if you specifically WANT a wooden RC sailboat. If you're attracted to the beautiful, classic look of a wooden hull and you aren't all that concerned about having the absolute fastest boat on the course, and you've got a couple thousand dollars and hundreds of hours to spare, then this is the hobby for you! Oh, and you'll need some tools too, so it's a great excuse to go tool shopping.
Still interested? Okay, then here's what I would suggest...
Research the Hobby:
Check out your country's governing body for radio sailing. In the US, it's the American Model Yachting Association (AMYA). Look at which classes are sailed in your area. Is one of them a builders class or developmental class that appeals to you? One popular internationally raced class is IOM (International One Meter) and you can still build a relatively competitive wooden IOM.
Consider a Kit Boat:
Consider a kit boat. There are a few out there. A very popular wooden kit boat is the Tippecanoe T37. It's a wonderful kit that includes everything including the radio equipment. My first wooden RC boat was a T37 and I would never have gone on to build other boats without being "kick started" by it.
You make the boat on your own, but it comes with a very thorough construction manual that guides you through the entire process. You'll learn how to use epoxy and fiberglass (included with the kit), how the electronics work, and on and on.
In the Seattle, WA, USA area, the T37 is a very active class and there are many who can help you get started. There are also some very helpful YouTube videos that will guide you through the entire process.
A racing upgraded T37 will cost approx. $500 with everything included and you can see how well you work with wood. There are many beautiful T37's out there and yours might be one of them.
Here is my T37...


Fair warning! For some, myself included, the T37 is a "gateway" boat to many others! You can get hooked pretty easily.
After building the T37 I've gone on to build Star 45's, Vintage Marbleheads, and now I've just completed an IOM.
Other than the T37 there aren't that many wood sailboat RC kits out there. There are things called "short kits" though. A short kit is where you purchase a bare minimum from a company and then you supply the rest. For example, you can buy the laser cut frames for a Star 45. That's all you get, but you can provide the rest from easily available materials... it's the laser cut forms that are harder for you to create. A short kit is a nice way to get a start on a more complex boat.
TOOLS needed:
If you need an excuse to buy tools, then making classic, wooden RC sailboats might be reason enough to get an entire woodshop! But in reality you really only need a few tools, some of which you may already have.
Ignoring the smaller hand tools that many already have, you'll probably need to stock up on a few "hobby" tools like a razor saw, small screw drivers, hobby knives, etc...
If you're just making a kit like the T37 then that may be all you need. But if you're wanting to make your own boats from scratch, then you'll need a way to cut planks. I do mine on my contractor level table saw. If you don't have a tablesaw, then you might be able to purchase planks elsewhere too.
I've also found that a stationary sander is a necessity. I use mine all the time. There is no way I could have made my boat without one. In addition, I have extensively used a random orbital sander for shaping the hull.
Comments
Post a Comment