
I am using WEST System® epoxy for this boat, but I’ve also had great experiences with System Three®. Whatever brand you use, be sure to stick with it. Never mix and match resins from one company and hardener from another. Stick to one brand and follow their instructions.
Specifically, I am using WEST System® Group ‘A’ size cans of 105 resin with their 205 hardener. This epoxy uses a 5:1 ratio of resin to hardener; therefore, you’ll buy a quart of 105 resin and a much smaller tin of 205 hardener. They are usually sold together.
Using the WEST System® Mini Pumps: (They still actually put out a lot of epoxy!)
I use their ‘Mini Pump’ kit which includes measuring pumps for each can. They are easy to set up and use, and will dispense the proper 5:1 ratio.
CAUTION: System Three uses a 2:1 ratio, and some brands use a 3:1 ratio. Furthermore, each brand has its own ratios and you must follow them carefully! READ the directions closely for your brand. I assume you are using WEST System 105 resin with 205 hardener which requires a 5:1 ratio. If you are using another hardener, or a completely different brand, make sure you follow their instructions and adjust what these instructions accordingly.
The WEST Systems® mini pumps, despite their name, still put out a fair amount of epoxy for hobbyists making wood RC sailboats. The mini pumps are not really for hobby people, but really for small boat (kayaks, canoes, etc...) builders. You will still need these larger amounts for wetting out the fiberglass cloth and for clear coating the hull and such, but most of the time you will need smaller amounts.
Mixing Smaller Batches of Epoxy: Most times you will want to dispense much smaller amounts of epoxy for small gluing jobs.
1. Small batches stored in separate jars: First, you do not want to be removing the pumps from the cans every time you want to use a small amount as it can introduce air into the pump and screw up the ratios, so find yourself two small glass jars with lids and put a few pumps of resin into one, and a few pumps of hardener into the other. Store with the lids on. Label clearly, although it’s not hard to remember that the resin is clear and the hardener is amber. Both will need to have lids. The jars let you avoid trying to suck small amounts out of the cans with the pumps on them. Do NOT mix up the lids or you will permanently adhere your jars shut! Clearly label each jar!
2. Make Marked Syringes: Next, get two small syringes that most marine stores sell. Take the two syringes and cut the tip off 3/8" from the main body to make a hole large enough.
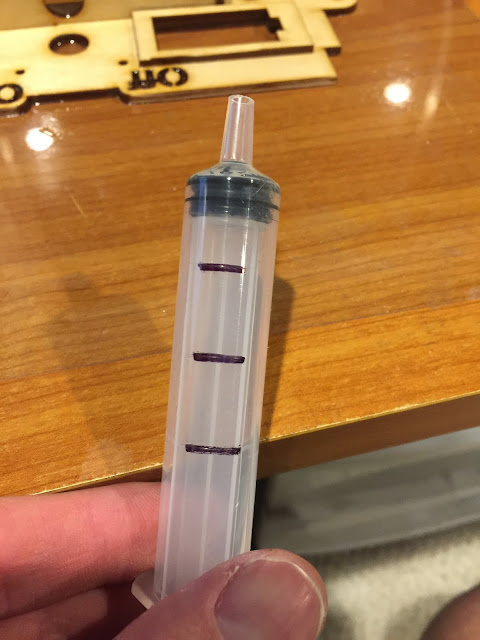
To use them accurately you’ll need to mark some lines on them. Starting at the wide body part of the syringe (not the angled part), mark a line every 1/8” for 3 or 4 lines. This will be your HARDENER syringe. Do NOT use in it the resin! It helps to use a fine tipped paint pen to make the marks. You can also use a Sharpie® type pen but you’ll need to score the syringe first and let the ink run into it.
This is what the hardener syringe looks like:

Take the second syringe and mark a line every 5/8". This will be your RESIN syringe. Do NOT use it in the hardener! Do NOT let the two syringes touch each other. ONLY use the resin syringe with resin, and the hardener syringe with hardener!
This is what the resin syringe looks like:
The idea is that, assuming you are using the WEST System 205 hardener, that you need a 5:1 ratio of resin to hardener and these two marked syringes will do that for you (Some other hardeners use a 3:1 ratio or even a 1:1 ratio. Each brand has its own mix and you must follow them carefully or they will not work! READ the directions closely! Adjust these instructions accordingly.)
To make a small batch of epoxy, draw one ‘mark’ of RESIN in the resin syringe (with the ⅝” marks), and one ‘mark’ of HARDENER (with the ⅛” marks) with the hardener syringe . Squirt each into a very small mixing cup that you can buy at your hobby store. Mix with a small stick and apply. For slightly larger batches simply draw two or more ‘marks’ in each syringe (just keep the number of ‘marks’ the same for each to retain the 5:1 ratio). Store the syringes separately in their own plastic cups. This will also let the excess drain out without getting all over your work surfaces. Do not let them touch each other!
Make yourself a box to keep the jars in. Mine is easily moveable, keeps the jars separated with hardener stuff on the left and resin stuff on the right, and has storage for stir sticks, mixing cups, and acid brushes.

Mixing even smaller amounts of epoxy: You can use the syringes to dispense even smaller amounts. You can use the ‘count the drops’ method. Just remember 5 drops of resin for every drop of hardener. 10 drops of resin and 2 drops of hardener can actually glue quite a bit. Plop onto a piece of paper, mix well with a toothpick and apply.
Good luck!
Specifically, I am using WEST System® Group ‘A’ size cans of 105 resin with their 205 hardener. This epoxy uses a 5:1 ratio of resin to hardener; therefore, you’ll buy a quart of 105 resin and a much smaller tin of 205 hardener. They are usually sold together.
Using the WEST System® Mini Pumps: (They still actually put out a lot of epoxy!)
I use their ‘Mini Pump’ kit which includes measuring pumps for each can. They are easy to set up and use, and will dispense the proper 5:1 ratio.
CAUTION: System Three uses a 2:1 ratio, and some brands use a 3:1 ratio. Furthermore, each brand has its own ratios and you must follow them carefully! READ the directions closely for your brand. I assume you are using WEST System 105 resin with 205 hardener which requires a 5:1 ratio. If you are using another hardener, or a completely different brand, make sure you follow their instructions and adjust what these instructions accordingly.
The WEST Systems® mini pumps, despite their name, still put out a fair amount of epoxy for hobbyists making wood RC sailboats. The mini pumps are not really for hobby people, but really for small boat (kayaks, canoes, etc...) builders. You will still need these larger amounts for wetting out the fiberglass cloth and for clear coating the hull and such, but most of the time you will need smaller amounts.
Mixing Smaller Batches of Epoxy: Most times you will want to dispense much smaller amounts of epoxy for small gluing jobs.
1. Small batches stored in separate jars: First, you do not want to be removing the pumps from the cans every time you want to use a small amount as it can introduce air into the pump and screw up the ratios, so find yourself two small glass jars with lids and put a few pumps of resin into one, and a few pumps of hardener into the other. Store with the lids on. Label clearly, although it’s not hard to remember that the resin is clear and the hardener is amber. Both will need to have lids. The jars let you avoid trying to suck small amounts out of the cans with the pumps on them. Do NOT mix up the lids or you will permanently adhere your jars shut! Clearly label each jar!
2. Make Marked Syringes: Next, get two small syringes that most marine stores sell. Take the two syringes and cut the tip off 3/8" from the main body to make a hole large enough.
To use them accurately you’ll need to mark some lines on them. Starting at the wide body part of the syringe (not the angled part), mark a line every 1/8” for 3 or 4 lines. This will be your HARDENER syringe. Do NOT use in it the resin! It helps to use a fine tipped paint pen to make the marks. You can also use a Sharpie® type pen but you’ll need to score the syringe first and let the ink run into it.
This is what the hardener syringe looks like:

Take the second syringe and mark a line every 5/8". This will be your RESIN syringe. Do NOT use it in the hardener! Do NOT let the two syringes touch each other. ONLY use the resin syringe with resin, and the hardener syringe with hardener!
This is what the resin syringe looks like:

The idea is that, assuming you are using the WEST System 205 hardener, that you need a 5:1 ratio of resin to hardener and these two marked syringes will do that for you (Some other hardeners use a 3:1 ratio or even a 1:1 ratio. Each brand has its own mix and you must follow them carefully or they will not work! READ the directions closely! Adjust these instructions accordingly.)
To make a small batch of epoxy, draw one ‘mark’ of RESIN in the resin syringe (with the ⅝” marks), and one ‘mark’ of HARDENER (with the ⅛” marks) with the hardener syringe . Squirt each into a very small mixing cup that you can buy at your hobby store. Mix with a small stick and apply. For slightly larger batches simply draw two or more ‘marks’ in each syringe (just keep the number of ‘marks’ the same for each to retain the 5:1 ratio). Store the syringes separately in their own plastic cups. This will also let the excess drain out without getting all over your work surfaces. Do not let them touch each other!
Make yourself a box to keep the jars in. Mine is easily moveable, keeps the jars separated with hardener stuff on the left and resin stuff on the right, and has storage for stir sticks, mixing cups, and acid brushes.

Mixing even smaller amounts of epoxy: You can use the syringes to dispense even smaller amounts. You can use the ‘count the drops’ method. Just remember 5 drops of resin for every drop of hardener. 10 drops of resin and 2 drops of hardener can actually glue quite a bit. Plop onto a piece of paper, mix well with a toothpick and apply.
Good luck!
Comments
Post a Comment